|
|
|
How to set up a rope-animation with local gravity - part 2 |
|
|
|
Select each cv of the curve end create a cluster. |
|
|
|
|
|
|
|
Select each cluster and the corresponding cube and parent the cluster to each cube. Now the curve is dynamically animated through the cubes. |
|
|
|
|
|
|
|
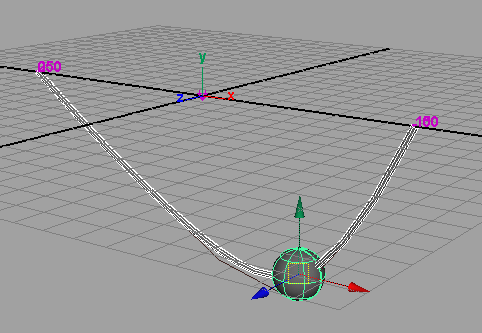
Create a sphere and attach it through a motionpath to the curve. In graph-editor edit the timing so that the graph runs from
value=0 at frame 1 to value=1 at frame 100. Create two additional keys with value=1 at 150 and value=0 at 250. Flatten the tangents. Now the sphere
should move between frame 1 to 100 from left to right and between frame 150 to 250 from right to left. Of course, this is only a test-animation to check the additional gravity later. |
|
|
|
|
|
|
|
Again, select the 5 inner cubes and add a second gravity-field, but this time with settings like magnitude=200 to 500 and attenuation=2.
Move the gravity to the center of the sphere and parent it to the sphere. Make a quick test and hit play. The gravity-field should move with the sphere and locally influence the cubes and the curve. To alter the "pulling" you can play around
with the magnitude setting and the stiffness-settings of the spring-constraints. |
|
|
|
|
|
|
|
What´s left to do: create a small circle and extrude it along the curve. |
|
|
|
|
|
|
|
Create a new layer and hide all the cubes in that layer. Later, if using shadows, don´t forget to turn off "casting shadow" in the render stats of the cubes. |
|
|
|
|
|
|
|
Now again, hit play and enjoy ... :) |
|
|
|
 |
|
|
|
If you want to skip all steps, you can download a test-scene here. |
|
|
|
|
|
|